Posted by: Hanna_Alldrin on 02/25/2009 02:15 PM
Updated by: Kim_Hamilton on 02/25/2009 04:25 PM
Expires: 01/01/2014 12:00 AM
:

"DIY" Bride ~ By Hanna Alldrin
Calaveras County, CA.....Another Great Addition to ThePineTree.net....The Pine Tree “DIY BRIDE” is a new column by staff writer and photographer, Hanna Alldrin. Every Wednesday Hanna will be posting new and innovative wedding ideas from decorations, attire, favors, flowers and more that any “DIY” (Do It Yourself) Bride can do....especially on a budget. This week’s “DIY BRIDE” topic is How to create your own wedding invitations…… 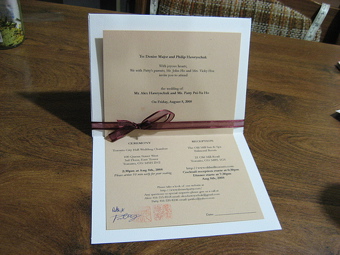 
Your Wedding invitation is the first impression your guests are given of your wedding's style, theme and atmosphere. Most Bride's-to-be want their invitations to be perfect. Well I always say, "If you want something to be done perfectly, you must do it yourself." Creating your own wedding invitations is nowhere near as difficult and time-consuming as it used to be in the days before computers, digital photography, and photo software. You can go to any craft store and choose from over hundreds of different papers, ribbons, and stamps that really make your invitations pop. Now days paper comes in any color you can think of, cool and sophisticated textures, prints and designs. With just a little time and imagination, you can create stunning wedding invitations. So lets get started on our own....
Before you start here are a few things that you will need to create your own wedding invitations:
a) 8x11 card stock paper (any color or design)
b) Scissors and tape
c) An 4x6 engagement photo or a favorite photo
d) A ruler (this will be your best friend)
e) Inkjet Printer
f) Ribbon
g) Computer
h) PATIENCE
i) Photo card with frame cutout
1. Before you start printing out your invitations, sit down with your fiance and brainstorm on what you want the invitation to say. Do you want a traditional, elegant, or simple saying, the style of your wording will set the tone for the whole wedding.
2. Once you have decided what you want the invitations to say, type them out on your computer, experiment with different fonts and sizes to go with the theme of the invitation. Then print and trim the paper to the correct size of the invitation.
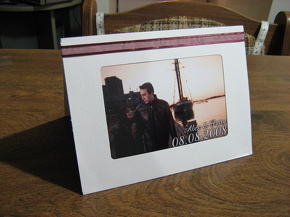
3. Take the 4x6 photo and insert it into the photo frame card. With double stick tape, tape the back side of your printed and trimmed invitation and center it in the middle inside of the photo frame card.
4. Now that the invitation is in place its time to add some color with satin mesh ribbon. Cut about 12 inches of ribbon and tie it around the fold of the card so that you have a bow as a surprise of the inside of the invitation.

5. Fold in half and bam your done! A nice modern and custom wedding invitation that any DIY Bride can do on any budget.

By Staff Writer/Photographer, Hanna Alldrin
|